Tuesday, November 29, 2011

Got mud?

Now that I've finally awakened from my turkey-induced hibernation, I'm excited to report the drywall in the rec room has been mudded. It's looking more and more like a real room again, folks! :)


Ceiling:


Here's one of the recessed lights installed:


They're all on dimmers:


Here's the laundry closet and bathroom coming along:


And does anyone know what this picture means? Drumroll please.............


TADDA! WE HAVE A DOORWAY!


I had used the green painters tape to be able to visualize a doorway around the old window when it used to look like this:


Now, we'll be able to get to the rec room through the living room instead of having to go through three other rooms around the rest of the house (check out this post with the old layout diagram).


Here, the edges look rough, but after our contractor worked his magic it looks much better now (knocking down doorways is beyond our scope of DIY knowledge :/ ). I'll share updated pics of the doorway soon! :)


And to keep Winston from jumping off the landing through the new doorway (there's about a 2-3 foot drop where stairs need to be built), we use this piece of cardboard as a deflection. Surprisingly, it works, haha.


Next up: Closet doors and choosing tile! :)

Wednesday, November 23, 2011

Bonus Post!

Sheesh! I go from 1 post in 2 months to 2 posts in 1 day! What's come over me?! haha.

I just wanted to pop back in quickly before the holiday to show you that my 'Thankful' pumpkins are back out on the staircase.


If you want, you can check out last year's post about these when I first put them out to say 'Halloween', then flip them around to say 'Thankful'.

Okay, that's all. Signing off for good now cuz I'll be too full of filling to get off the couch and post again til next week ;)

It's Turkey Time!

Gobble, gobble! -that's turkey talk for 'Well hello there!' :)

The other day I finally turned my stacked fall pumpkins into turkeys. They went from this...


To this!


If you didn't see how I created the original stacked pumpkins, you can check that out here. :)

This cute little Thanksgiving day bird came together with only 4 cheap craft items from Michael's for under 12 bucks ($11.23 before tax, to be exact): Feathers, googly eyes, craft wood, and red balloons.


I took out the white pumpkin from the middle of the stack, and sat the top, small pumpkin on top of the end of a red balloon - which Google taught me today is a male turkey's wattle, used to attract females.


I also read that the bigger the wattle, the more attractive the male is to a female turkey ;) no joke! My turkey's wattle has got NUTHIN on this guys! :)

found here
 For the eyes, I dabbed a bit of quick-drying super glue on the back of 2 googly eyes (4 for the set of gobblers) and stuck them on just below the stem.


The beak is a wooden mini stake picket from the craft wood section in Michael's. A pack of 8 was only .29 and I only used two (more for next year!). Since the pumpkins are getting soft (I've had them out since September) I was able to just shove the beak right into the pumpkin 'head' no problem.


I bought four packs of multi-colored turkey quills (that's what they were actually called - perfect!) and stuck em in along the backside of the large, bottom pumpkin.


Here's the two of them, chillin on the porch on either side of our front door:


Anyone wanna come rake my leaves? :)

And here's a side-by-side before & after of them stacked, then turned into turkeys:


So that's how these little turkeys came to visit the Storm household, just in time for Thanksgiving :)


Hope your Turkey Day is full of family, friends, fun and good food!

Tuesday, November 22, 2011

We Have Drywall!

Drywalling has begun in the rec room - 3 cheers for drywall!!! It's starting to look like a room again now :)


Ceiling in half bath (with exhaust fan - didn't have a functioning one before):


Drywall started on half bath wall and laundry closet:


The following are some before drywall and after drywall shots (BD and AD, haha):

BEFORE

AFTER


BEFORE

AFTER


BEFORE

AFTER


Mudding has now begun, further making the room look 'normal' again, haha! And Houston, we have a doorway to the living room! Can't wait to show you!! :)

Monday, November 21, 2011

I love the French!

I LOVE the new french doors in our rec room! (Okay, I love France too, and took 3 years of French in my high school foreign language class) :) But boy oh boy look at these B-E-A-Utiful french doors that got installed in place of the single door in our rec room:


Get ready, here comes a closeup (and please ignore the mess you see beyond the doors on our porch - that's where our outdoor furniture is stored for the winter. And for this project, that's where the supplies are kept and wood gets cut, etc):


You may or may not remember what it used to look like before so here's a refresher with a side-by-side before and after:


The big blue piece of insulation was there covering the entryway to the kitchen for two reasons. For one, it was so cold in this room since it had no heat, leaky windows and no insulation. Now that the new vents, insulation, and windows are in, it's much warmer and we don't need the insulated 'doorway'. But we're still using it since the floor is dirty and Winston would be running amuck out there if we didn't block the room off.

Speaking of new windows, here they be:


one of the two smaller windows on side wall of house

one of two larger windows on long, backyard wall


both windows on backyard wall

Here's one of two new vents in the room. This room finally feels as warm as the rest of the house!


As you can see, they had to cut into the concrete to lay the duct since this used to be the porch and there's no basement under this room.

In the ceiling, all the plumbing from the upstairs bedroom's half bath and the bathroom fan venting was re-routed through the rafters. They orgininally hung below them which required the old drop ceiling my hubby tore out.


Also in the photo above, you'll notice electrical was installed for recessed lighting (the whole room was also re-wired). We're going to have four recessed lights in the room; two in line with the kitchen entry and two in line with the soon-to-be living room entryway. 

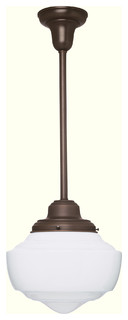
The pic above also shows a blue electrical box in the middle of the ceiling. That's for a drop-down light we already had and can't wait to install. It looks like this:


image found here

Additionally, the framing is up for the room's half bath and laundry closet:


laundry closet

half bath (toilet will go on the right, sink on the left)
 More progress? The new living room doorway's been cutout on the brick side of the rec room:


The brick's gone but the plaster's still there (we're waiting til the very end to have that removed, again cuz it's MESS-Y!).

There's quite a drop from the bottom of the living room to the floor in the rec room, so 3 steps will be installed here:


 I seriously can't WAIT til this part of the project is completed!! :)

Check back again. I'll have drywall pictures for you soon! The room is really starting to look like a room again and not an empty shell of a room! :)


Related Posts Plugin for WordPress, Blogger...