Wednesday, August 10, 2011

Fireplace Fiasco

It is HOT as a FURNACE here in Central PA and, without central air (at least I have window units) I'm absolutely melting! We're planning to have central air installed in time for next summer though.

But since I've got heat on my mind, I figured I'd blog bout something heat-related. I don't think I've done a post yet about our living room fireplace.

Last year around springtime it looked like this:


Do you see all that brassiness and the ugly hearth tile?


From the paper and tape in the pics above, I suppose you can guess what was about to go down :)


Yup, I ORB'd (oil-rubbed bronzed) that bad boy with spray paint. Ain't she perty now? :)


But wait! I still had the red-tiled hearth to contend with :(


I'd eventually like to install large slate or some other type of dark gray stone tiles as an overlay, but until we have the disposable income for it (disposable income? what's that? :)  ), I went with this as a temporary cosmetic fix:


In theory, I thought it'd be a great solution to my can't-afford-real-stone-tile-right-now-dilemma. I say 'in theory' because in real life, it wasn't as aesthetically pleasing as I'd hoped...more on that later.

But here's what it looked like after coat 1:


And here it is after coat two with all the tape pulled off:


Ick.

I didn't like it (I probably should've just sprayed right over the grout lines instead of taping them off) because the grout looked gray and dirty compared to the lighter stone color I'd just sprayed on the tiles.

But I lived with it...for more than a year! Here's what it looked like more than a year later:


No better :(

Finally I (and my husband) had had enough of it. It was a constant dust bunny attractor (Due to the texture of the finish) and it never wiped clean thoroughly.

MAJOR FAIL.

Chalk this project up to 'you win some you lose some.' :)

But after a year of it looking constantly dirty, I took a cue from YHL and their fireplace hearth makeover and painted out the hearth in semi-gloss white. Here's their before and after (note, they also painted their brick white. I did not):


So I got out my spackle tool since it had the sharp, flat scraping edge I needed, and went to work scraping off the majority of the textured paint:


Even though I didn't get all the paint off (that would've taken days!) I made sure to get a smooth surface so my finished product wouldn't be bumpy or look sloppy.


Here's what it looked like after all the scraping, a good sanding with medium-grit sandpaper, and then vaccuming up and wiping down the entire surface so there was no debris:


Then came a coat of Olympic, No-VOC primer:


Wow. What an immediate change for the better, even after just the primer.

Then I did two coats of Olympic, No-VOC, white semi-gloss paint:


MUCH better!

But I still needed to find a fix for one little detail - the gap between the front of the tiles and the wood flooring (there used to be pink carpet on our floor from the previous owners and it hid this gap before we ripped the pink monster out):


So I sorted through our little stash of trim pieces we have left over from other various projects we've done and found this perfectly-sized (in width and length) piece of trim:


Then I used a thin line of Liquid Nails to adhere it to the floor/tile, hiding the gap perfectly!


What a difference from before to after! :)


Thanks to YHL for the 'A-HA!' moment.

Has anyone else re-vamped their fireplace or hearth with paint, or better yet beautiful stone? I can't wait to install some scrumptious slate down the road!!

Monday, August 8, 2011

Ghost Post

Look, I caught a ghost!


Haha, poor Winston. He puts up with so much...what a good dog :)

Anyone elses dog let them throw blankets over them and pretend he/she's a ghost? I'm the only one? awkward...  :)

p.s. No weimaraners were hurt or harmed in any way throughout the making of this post.

Thursday, July 21, 2011

Yikes, Stripes!

Anyone remember that old commercial for Fruit Stripe gum that went, "Yikes, Stripes! Fruit Stripe gum!" ?


image found here

Haha, oh how I miss those days! Well, I finally jumped on the stripes-in-decor bandwagon and it totally got me thinking of that old commercial and gum :)

Although, my stripes aren't as colorful as the gum. I went for a more muted stripe effect on something in our master bedroom:


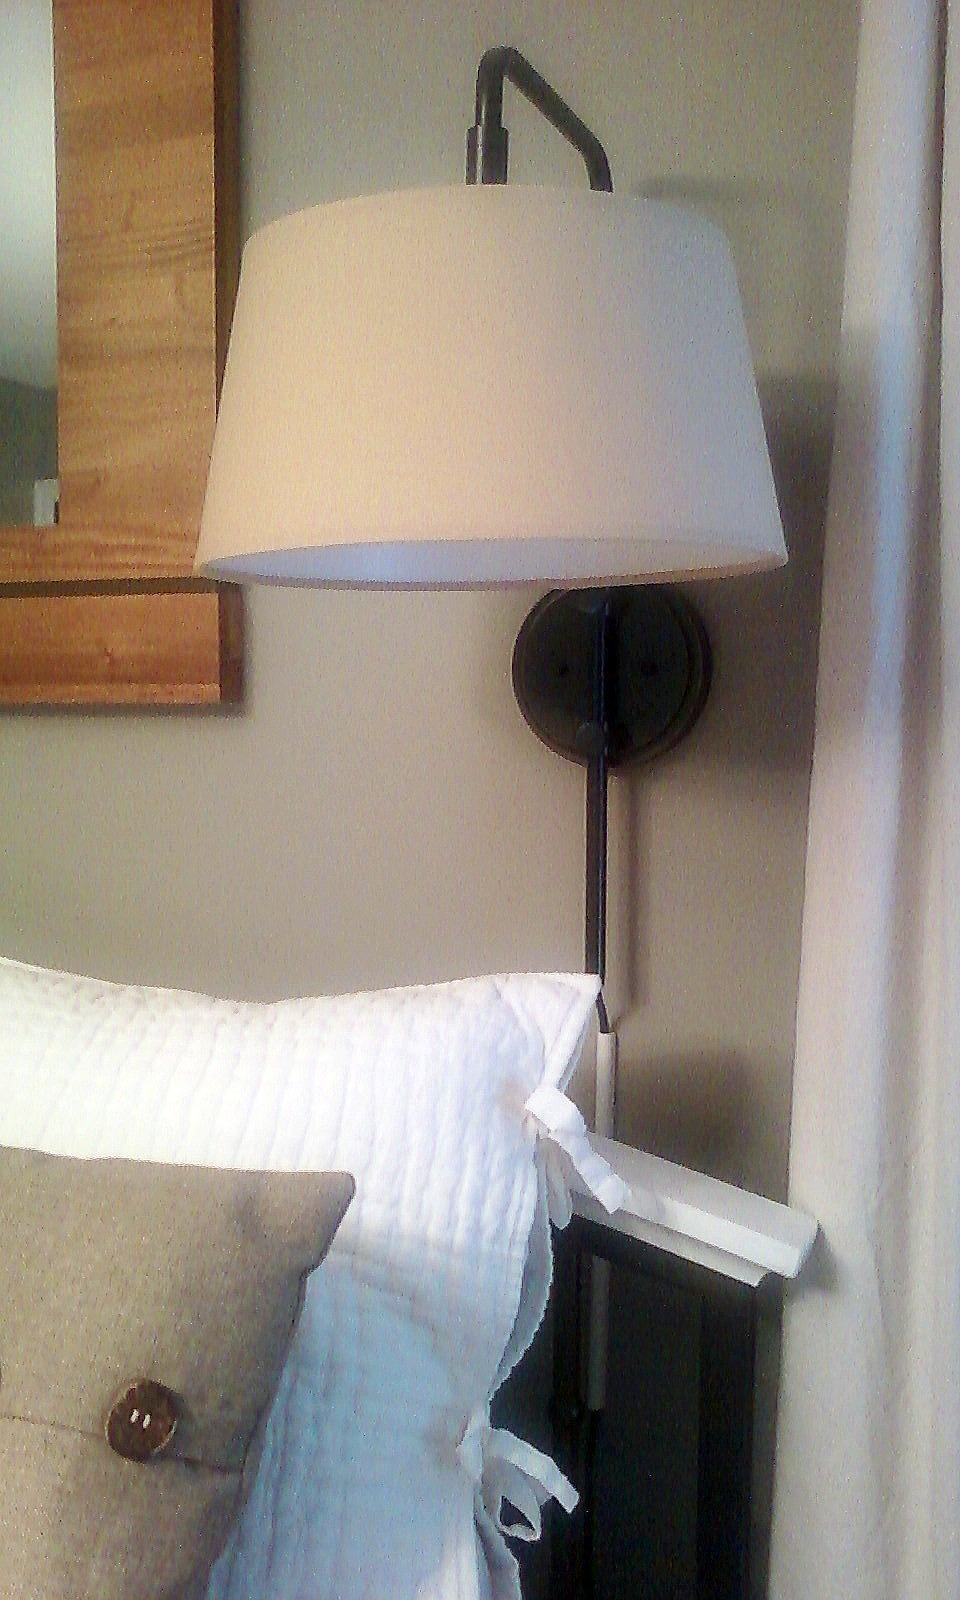
The shades on our wall-mounted sconces (I finally installed them and checked that to-do off my master bedroom list!).

It's hard to tell in the photo above and below, but the shades were a deep gold color - too gold for my tastes and they didn't really vibe well with the rest of the room. They definitely stuck out like a sore thumb.

I wanted to lighten them up and add some pizazz...So I whipped out my roll of frog tape and wrapped strips of it around the shade:

(here you can tell better how gold in color the shades were in real life)
 No measuring folks, I just eye-balled it getting each stripe's width about the same size. With other projects I'm sometimes more meticulous, but for this one I just felt like winging it, dagnabbit :)
Then I painted the exposed sections with 2 coats of the same antique white craft paint I used in my oar project...

and this is wat it looked like after the second coat:

Before the paint dried I began pulling the painter's tape off...

And voila!

Then I did the second one so I ended up with the same finished product:

Here they are, back on the sconces above the bed:


I love it!

This project was FREE (the best kind!) AND I'm swooning over how it matches so nicely with the rest of the colors and decor in the room, especially the bedding.

So that's me...finally jumping on the stripe decor bandwagon oh, about 2 years into the trend, haha!...Oh well, it feels good!

Anyone else just now getting into the stripes-in-decor trend? Don't worry - you obviously aren't the only one ;) And hey, you know the saying...better late than never! :)

~Amy

Tuesday, July 19, 2011

Well, I did it...

I completed my first triathlon since 2004. It's the second one I've ever done, and I was easier AND harder than I expected :)


Here I am, still alive after it all :)


The following are a few photos my supportive hubby and his parents snapped during and after the event. There aren't any pics of the swim, which I found to be my best event of the three (it was swim, bike, then run), but it was a .8 mile swim in the Susquehanna River just of City Island in Harrisburg. I was nervous about the distance, but with the river's current, I actually really enjoyed the swim...the bike, not so much.

Here I am in the transition area just after the swim, getting ready for the 14.5 mile bike ride:


As soon as I got on my bike I knew something was wrong. Can you tell what it is by looking at the pic below?


Yep, I don't understand how (I'd checked it the night before and morning of), but I had a flat back tire right out of the gate, with 14.5 miles ahead of me.

Needless to say, fear and doubt crept into my mind saying, "This is it. I'm done. I'm not going to be able to finish."

But then my mind shut off for awhile while and I just let my body go through the actions as I pulled over, grabbed the pump my husband helped me install on the frame of my bike JUST the day before, and started filling the tire with air (hoping and praying to God there wasn't a nail or something that would let the air leak right out again.

After filling and testing it, it seemed to be holding the air, so I hopped back on and hoped for the best. I just thought to myself, "I'm gonna see how far this lets me go and then deal with whatever happens then at that moment. In this moment, I need to pedal."

So I pedaled. And around the halfway mark, I realized my tire was still holding up and I was going to be able to finish the bike, which meant I was going to be able to do the run next, and finish this beast! :)

Here I am riding back into the transition area to get ready for the run:


Even though I was happy to have been able to perservere through a flat tire, it set me back so far that I knew coming into the 5K run I was going to be one of the last people to finish:


But guess, what...I finished. And that's what matters. I ended up having a great run time (for me), and even though I didn't place well, I'm simply proud I finished, especially after thinking earlier that I wasn't going to be able to!

My total finish time was 2 hours and 7 minutes.

Here I am scarfing down a bagel afterwards...mmmmm carbs.... :)


And here's my loving husband who, without his support, I probably wouldn't have even done the triathlon.

Thanks Mikey, I love you! :)


So overall, I'd say this experience has taught me two things:

1- When faced with seemingly inevitable failure, keep going, keep pushing forward. Because you'll probably find that that seeemingly inevitable failure was just that - seemingly - whose very definition is: apparent to the senses or to the mind, but not necessarily true or real.

2- I've learned what a profound thing it is to push your body (and your mind as a result) farther, faster, and harder than you thought it could ever go. Discovering that has given me a deeper appreciation for this sport, and a sense of pride in knowing that saying is true: You really can do whatever you put your mind to :)

So, anyone else out there reading this accomplish something they didn't think they could? Any other beginner multi-sport racers out there like me? Or am I the only crazy one? :) Let's talk!

~Amy

Tuesday, July 12, 2011

Summertime and the Living's Easy

I've got some summer-lovin decorations going on in the house and a new-ish finished project to show you. I did it awhile ago, but with work and life being busy (as it usually is in the summer) I haven't been able to post about it til now. That, and I JUST took the pictures - go team lazy :)

When I did our stairwell photo gallery, I showed you in that post a picture of our upstairs hallway, directly at the top of the stairs:


Well today, it looks like this:


I took a cue from the other expanse of wall in that hallway (featured in this post)...


 ...and continued the board and batten treatment so now it continues through the hallway for a cohesive look:

 
(The natural light coming into the hallway here is from the bathroom which directly across from that left wall)

Let's take a look what I have on the wall above the board and batten:


And another angle:


The pictures inside the hanging white frames are (from left to right)...


A pic I snapped in Ocean City, Maryland last summer,


...starfish,


...and driftwood.


Mounted above the pictures (which are hanging on a piece of driftwood with pegs) is an oar:


It's from Mike's grandparents and it used to be a yellowy polyurethaned wood tone. It wasn't bad but it needed some pizazz...so I Amy-fied it :)

First I painted it navy blue and white:

Yep, that's my ironing board with trash bags over it...multipurpose people! :)
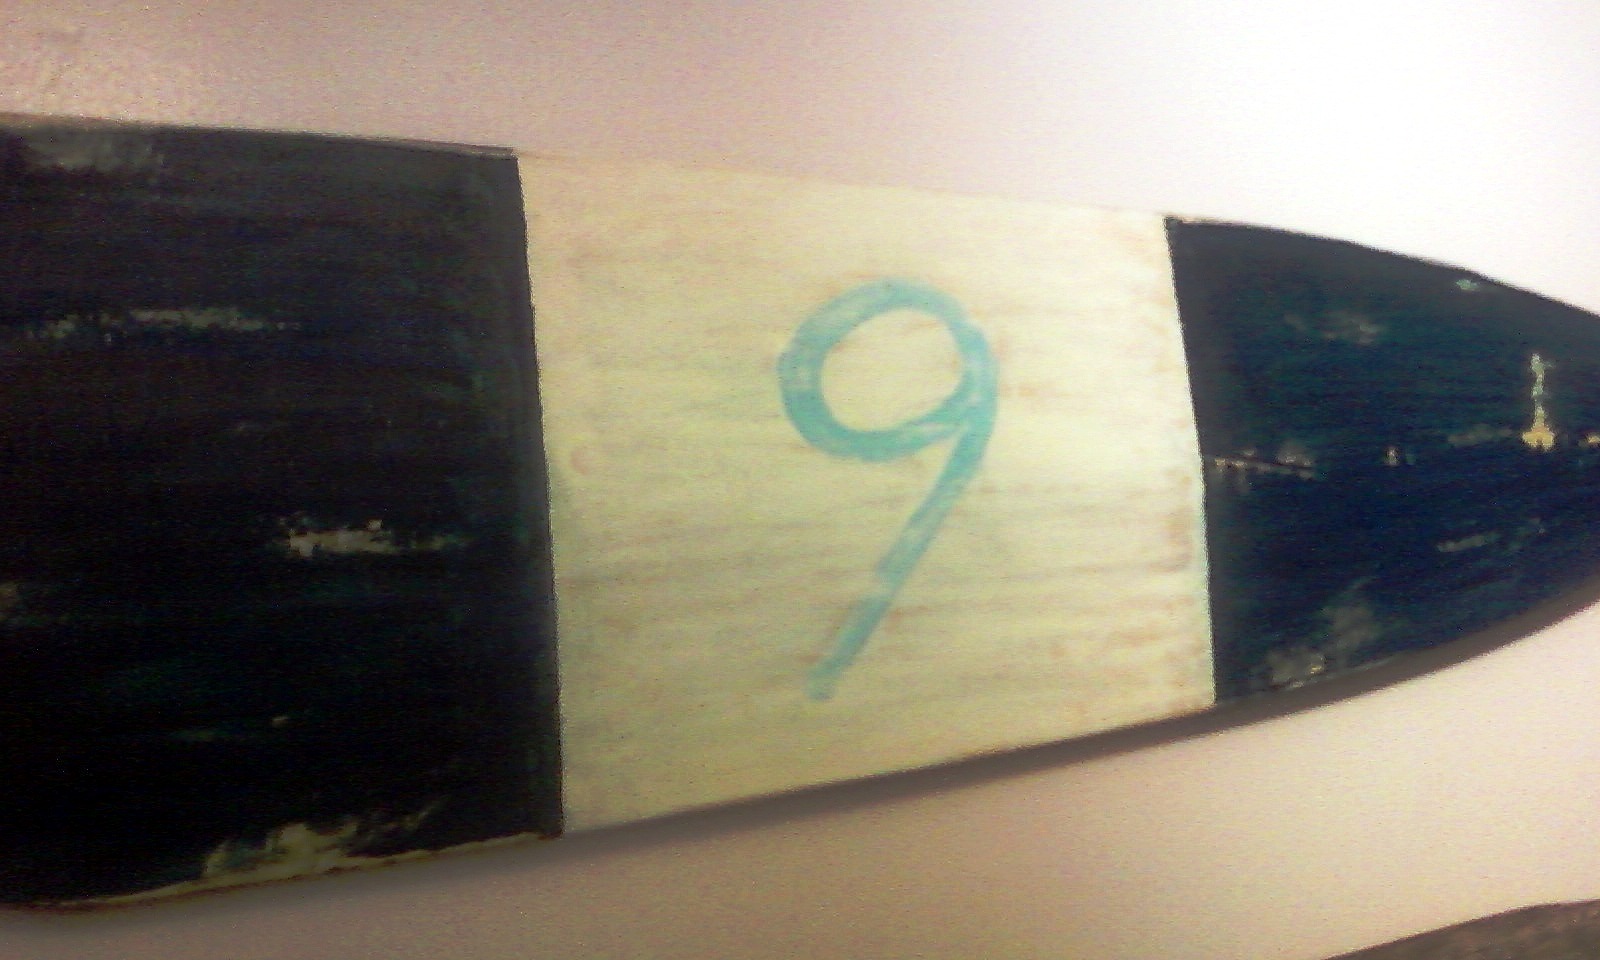
 I was able to make vertical lines between the colors by using painters tape for a clean straight line. Then I free-handed the number 9 (as in 2009 - the year of our wedding anniversary) in a light blue. The paints I used were the little craft paint bottles you can get at A.C. Moore or Michaels.

Then I ruined it...on purpose :)  I took medium grit sandpaper and roughed it all up. I wanted that worn look, as if it had actually been used in a canoe race...which, come to think of it, for all I know it just may have  been. I should ask Mike's Nana.


Then I heavily watered down some more of the same white craft paint I originally used, and went over the whole oar for a weathered white-washed look.

Here's a little better close-up of the number after being sanded and white-washed:


So here's the before and after, side-by-side:

Oh yeah, and see the light switch in the middle of the first photo above? I spray-painted the black switch white, then disguised it (hopefully, haha) among the vertical strips of wood so it blends in better and doesn't stick out awkwardly.
Here's a view from the bottom of the staircase:


And speaking of staircase, remember what THAT used to look like?! WHOA.

Needless to say, this area of our house has come a loooooong way and I'm very happy with its progress.

Hope everyone's summer is going swimmingly! Haha, see what I did there? Summer...swimmingly...I kill myself ;)


~Amy
Related Posts Plugin for WordPress, Blogger...