Today you get to see the Before and After total transformation of how we went from this:
To this! :)

If you're just joining us, Monday I showed you how this time last year we cleared the yard of forsythia bushes, lilac trees, and a gate to nowhere. Tuesday I showed you how we took down a crumbling wood fence and dismantled an old shed with a little 4 wheel drive action :)
Also yesterday I left you with this sneak peak of a photo of our fencing:

So here's how Project Build a Fence went. First decided on the type of fencing we wanted. With a 100lb. Weimaraner who likes to put his paws up on things, we knew we needed a 6' privacy-style fence.
As for deciding on fencing product, we chose composite (a wood and plastic mixture) because 1- we didn't want the required maintenence that comes with an all wood fence, 2- metal fencing was out of the question due to its cost, 3-we didn't care for white or beige (really the only color choices) vinyl that over time can turn green or show dirt, plus we heard vinyl fencing can split or crack easily like if the lawnmower were to spit a rock out a rock at it, and 4- we wanted something more aesthetically pleasing than chain link fencing.
So we went with the Woodshades Brand of composite fencing from Lowes in the Dog-ear style and Barnwood color:
 |
| (Panel image found here) |
Composite has the rich look of wood with low maintenance, it won't rot, split or crack. Plus it has a 20 year limited warranty. Sold :)
Based on the dimensions of our yard, we calculated how many panels, posts, cement bags, and gates kits (we put in two - one in the back leading to the park, and one at the side of the house leading to and from the back yard) we needed and placed our order.
Then when it all arrived we rented a 2-man auger from a local machinery-for-rent kind of place that we used to drill our post holes. It looked like this:
 |
| (Photo from here) |
Then we measured according to the width of the panels (6ft wide) and marked each spot where we used the auger to drill our holes (about 3 feet deep). The auger-drilled holes are shown the photo below (except that in this photo our holes weren't spaced exactly 6' apart because we were ending at the side of the house and needed less than that to finish out the row).

If you've never used an auger before, here's a tip my husband would give you: Prepare to be sore :) If I had taken a video of the hole-drilling process, here's what it would've looked like:
Do you see all the work they did just for that one hole? My husband and our neighbors Dave and Mike did that for more than 40 post holes. 40 HOLES! ouch. I'm thankful we had the guys helping because there's no way I would've been able to do that. My only responsibility with the auger was pulling the engine's start cord (just like on a lawnmower) while the guys stood braced for the spinning action of the giant drill bit.
After all the holes were dug we started with setting the first post in concrete in the back left corner of the yard. Then we slowly worked our way outward in a reverse 'V' fashion doing a panel and post on the back line, then a panel and post on the left line, and so on, like so:

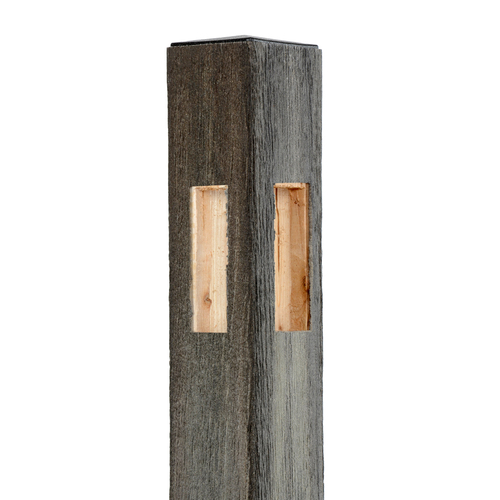
Each panel has 3 horizontal planks that are exposed at the ends (you can see them in the panel photo 5 pics above) and those fit right into the post holes shown in the example below:
 |
| (photo from lowes.com, found here) |
 |
| (You can see that there's much more space under the fence closer to the the gate than there is at the starting left corner. That's because there's a slight negative grade in the slope of our yard from left to right. We solved this issue by bringing in a load of dirt fill and shoveled it under and around the gap.) |
And here are shots of the left side done from the back corner up to the front gate:


As we went along, we used 2x4s at strategic posts (as seen in the above and below photos) to serve as extra support while the concrete set in the post holes.

Here's a shot of ours and our neighbor's front gate kits assembled and installed:

(Ours is on the right and our neighbor's is on the left. That weird discoloring was just from that panel being wet, once it dried it wasn't noticeable.)
Here's a wide shot of the back and left sides done:

And below is the right side before we put any posts and panels in:

You can see the all the holes we dug and if you look close enough, you'll see the white string line our neighbor Mike set up. Mike's a contractor and is very knowledgable about fence building. The line is there (tethered to a stake in the ground, from the back corner to the front) as a guide so when we set our posts they were all touching the line making a straight and level row of finished fencing. Of course we also used a level to double check that everything was straight and plumb.
Also in the photo above, can you see all those rocks piled in front of the gate? Those were some doozies we came across while augering. Every time the drill bit hit one, it was not a fun time digging it out :/
BUT as you'll see in the completed fence photo below we put all those rocks to good use:

We used them around our fire pit! It worked great. And as you can see, Winston loves running around at hyperspeed in his new back yard :) And after all our hard work, we sure love it too!
Let's have one more look at the before and after.
Before:
After:
Thanks for coming along on this trip down memory lane. It was a fun ride :)
If you stay tuned, later I'll show you what me and hubs did with this sunroom portion of our back porch.

Anyone else take on a backyard, DIY fencing project? Let's commiserate! :)
Linking up to Thrifty Decor Chick's Before and After Party!

Have a good day!
~Amy
Ya know - this actually makes your yard look MUCH bigger than with those horrible bushes everywhere. Nice job!! :-)
ReplyDeleteI agree that this actually makes your yard look MUCH bigger than with those horrible bushes everywhere.
ReplyDelete