Thursday, March 31, 2011

Just Beachy

Not too long ago I saw a post Layla, from The Lettered Cottage, did where she made over her bedroom dresser and I was immediately inspired! Wanna see what I came up with? Here it is!


See, Layla did a rope pull on her dresser drawers and once I saw that I HAD to copy for a nautical themed dresser re-do I had been brainstorming about. I followed her steps pictured below:

(Picture from TLC here)

My dresser is not quite done yet, but here it is, near the finish line:


I decided to do the knotted rope pulls on the 2nd and 4th drawers, and keep the original knobs (that I stained the same color as the top) on the 1st and 3rd drawers. Here be the knobs:


The stain on the knobs is still drying which is why I've yet to put them back on. Oh, and that's stain on my finger...not blood. :)


And yes, that's a tarp in my living room where I painted this piece. The foul winter weather that seems to be haning around isn't going to stop me from doing what I love! :)

I'm just thankful my husband puts up with little spur of the moment projects that spring up around the house like this. Thanks hun ;)


In the photo above you can see the roll of rope I used, which came from Ace Hardware, and the Minwax finishing paste is what I used to seal and protect the dresser after I painted it. It dries with a nice hard protective coat, without too much of the shine that gloss polyurethane has.


My painting technique for this was kind of trial and error. I knew I wanted a rustic, beach-cottage finish and so I started with a light grey as the base (which was a paint sample left over from our bedroom makeover - pics are halfway down that page), and then once dry, went over it with white enamel paint we had in the basement.


When that dried I went to town with some sandpaper and distressed spots that would get the most natural wear, i.e. around the handles, corners, and edges.


I sanded down and stained the top and knobs Minwax's Dark Walnut. I like the nice contrast between the warm, dark top and cool, breezy bottom:


(Haha, 'breezy bottom' just made me laugh. That sounds like an issue with an open fly on your trousers or something!) :)

This dresser was all light-colored wood before. About halfway through the painting, it wasn't turning out the way I had envisoned. I was about to throw in the towel and just paint it all white, haha.

But I'm really happy I stuck with it, and now I love how it's turned out! :)

How bout you? Any projects you've started and then hated halfway through? Did they end up just how you wanted? Better? Worse? Do tell!

Happy Thank-God-it's-the-last-day-of-March-and-tomorrow-is-April Thursday!  :)
~Amy

Wednesday, March 30, 2011

I'm on Island Time


When we bought our home in 2009, it came with a poor excuse for an island. See below:


Really? Who is THAT lazy that they use the floor tile for the body of an island? I know who: our house's former owners, that's who:


The edges were so bad from being bumped or scraped or who knows what. It looked shabby, cheap, and made me CA-RA-ZY.


Along with a lot of other wrongs we've righted since moving in, this poor baby was transformed from blech, to BAM! Here's what we did.

I started by ripping off the shoe moulding around the base of the island:

(Notice I'd aready painted our cabinets white from the time the above photos were take til I started this project?)

Here's a close up of the bottom trim being removed:


Then hubby and I went to Lowes and picked up one sheet of bead board (I think it was 4ft by 8ft) and had it cut in half at the store so we could fit it in our car to take home.

Sorry for no other progress photos, but here are some juicy 'after' pics for your viewing pleasure:


We measured the 3 sides' length and height (the 4th side on the back are cabinet doors), and then made the cuts.

Then we used liquid nails on the back sides of the beadboard for extra hold, then nailed each of the three panels at the tops and bottoms. A nail gun would've been a good tool to use for that part. Instead, we did it the old fashioned way so it required a bit more patience :)

Where the corners met, if you look really close, you might be able to see the small dowel rods I glued, caulked, and painted in with the rest of the beadboard. It gives the edge a seamless transition around the side and looks just like the beading in the beadboard itself.


While we were at Lowe's for the beadboard, we picked up some nice, chunky baseboard molding to finish it off with a clean, traditional look.


 Much better, than this, right?


RIGHT! :)
~Amy 

p.s. As I've mentioned before, we've also installed shiny new appliances so I'll have to take updated photos of them and share soon.

Tuesday, March 29, 2011

Whoa, is that a?...Weird.

I'll clip coupons from time to time, and as I was clipping a little while ago I came across this doozy of an ad for Life Alert. Can you see what makes this ad 'interesting'?


If you noticed the odd extremity growing from this woman's neck (that also happens to be attached to a wrist watch?) then you saw what I saw. What the....? I have no words.

I tell you what though; if I had a tumor-like finger growth in my neck, I'd probably live alone and have to have Life Alert too :)

So, do you think I should send this into Jay Leno for Headlines? I would if I wasn't a loyal Team Coco fan. And yes, I made that url link orange on purpose :)

Go Team Coco! :)
~Amy

Monday, March 28, 2011

Last week I was perusing the blogosphere when I came accross something pretty nifty. I had heard of using olive oil on old, tired, dried out wood to revitalize it, giving it more luster and new life. But the nifty thing I read said to add some vinegar to the oil.

I'm not quite sure what the vinegar's role is (maybe it helps remove some of the dirt while the oil polishes?) but I set out to give it a whirl, and I had JUST the piece to try it on. I mixed up a batch of 3/4 cup oil and 1/4 cup vinegar, grabbed an old rag, and went to town on this cute little table:


In the photo above you can see the difference from before to after. I had done the left side and stopped before reaching the right side and finishing the drawer front.

It's like the wood was so dry and dehydrated, it was thir-sty!

Before/During:


After:


And just for fun, a side by side comparison since I, apparently, was too lazy to take a true before and after photo :)


You can DEFINITELY tell the difference from looking at the legs. I'm diggin the results...fo sho :)

Next up I think I'll try it on this cool wooden crate and the old, wooden tool caddy sitting on top:


Happy Monday!
~Amy

Friday, March 25, 2011

That Sinking Feeling

I'd love to save up for and DIY install a new kitchen sink. But not just any kitchen sink, no, I'm dreaming of a white, apron-front (did you think I was going to say Christmas? haha), kitchen sink like these :)


BarclaySingle-Basin Fireclay Apron Front Kitchen Sink
Barclay Single-Basin Fireclay Apron Front Kitchen Sink

BarclaySingle-Basin Fireclay Apron Front Kitchen Sink
Barclay Single-Basin Fireclay Apron Front Kitchen Sink

BarclayDouble-Basin Fireclay Apron Front Kitchen Sink
Barclay Double-Basin Fireclay Apron Front Kitchen Sink

And a bronze, pull-down faucet to with it, like this one:

Or this one:


And, ooh la la, this one:


Problem is, these lovlies aren't cheap. To save up for one of these sinks and a faucet, we're looking at just under a grand, or above with more expensive versions. Ugh, why does pretty have to be so pricey? :(

Plus, we have a perfectly functioning (albeit aestheticly mind-numbing) sink and faucet so these are certainly 'nice'-to-have, as opposed to 'need'-to-have items. That, and we've got a slew of other To-Do's on our home-related list that take much higher precedence like installing central air, putting in new windows, insulating our attic, refinishing the hardwood floors, moving the laundry from the basement to the first floor and so on and so on...New sink and faucet? I'll keep dreaming :)

What are your dream home-related items on your wish list? Any of those dreams come true for you already or are you having to hit the snooze button like me? :)

Have a great weekend and see you next week!
~Amy.

Thursday, March 24, 2011

A Sense of Self

I've found it! Finally! No, not my mind - some would say that's still lost as evidenced by the photo below :) 


That's me on the left and Lil Sis on the right.

Here's a nicer one of me and Lil Sis just so if your reading this Sarah, you don't get upset that I didn't show you looking normal ;)


What I'm getting at is I finally found how to describe my sense of style. And I don't mean my style in clothes either:


(This is the nicest you'll ever see me looking - in this pic I'm dressed for work. When I'm home I'm usually in sweats and t-shirt :) And yep, that's my dog's business end in the background)

What I mean is, this post is about finding my sense of decorating style.

For awhile now (ever since I've had a space of my own - from my first apartment to the house my hubby and I own) I've searched for a term that adequately described my sense of style and how I like to decorate.  I used to say my style was country, but then some country is a little too country for me, if you know what I mean. Plus, some country decorating gets to cluttery and I start feeling claustrophobic.

I also love primitive and rustic elements, but sometimes those elements can be too primitive and too rustic and look a little dirty, making a house seem disheveled, rumpled, and downright unkempt.

So then I'd sometimes say that my sense of style is pretty traditional, but really, when I'd say the word 'traditional', what I actually heard is 'uninteresting' and 'unexciting'.

More recently, I've fallen in love with industrial design, but if you're not careful, a room can quickly become cold and sterile from too much metal and the hard lines this design style embodies.

*** In no way, shape, or form am I meaning to offend anyone who subscribes to any or all three of the above styles. I'm just expressing my feelings, and to each his/her own, right? Right. ***

Then, just this week, I received a magazine in the mail with an article that made it crystal clear!

Century 21 (through whom we bought our home) periodically mails free magazines called "At Home" with various home-related articles and how-tos. Normally I breeze right through it (they're only about 20 pages or so in length) and then toss it into the recycling. But something on the cover of the March/April edition grabbed my attention.

Under the headline, "Hot Home Trends" read 'Modern Country'....hmmm, I wondered what they meant by that, cuz in my mind, Modern and Country are polar opposites in the decorating world. And I've never really cared for some of the loud or expressive elements and colors often found in modern design - I mean, I LOVE looking at modern spaces, but more as a work of art than a space I feel comfortable living in. After all, I thrive on soothing, neutral color pallets and subscribe to an 'only beige, white, and grey on the walls' kind of lifestyle).

On the other hand, a bit of the minimalistic aspect often found in Modern design is something I can relate to and appreciate, you know? Because lately, for some reason or another, clutter has become absolutely hive-inducing for me :)

With my interest fully peaked, I flipped to the article on page 14, where the full-page photo took my breath away Feast your eyes:

O. M. G. this SCREAMS me! The long farm table (I made one for our patio table that I'll show you in an upcoming post), the white wood-planked walls and ceiling with exposed beams, the old, large photograph taking center stage on the wall, the light fixture above, a piece of driftwood (or maybe it's an antler?) sharing the table with beautiful fresh flowers. And that's it. It's simple, fresh, inviting, and cozy all wrapped up as one.

Page 2 starts the article where five lines in, it was like the author had read my mind. The text is tough here but it says a client had "grown tired of her home's traditional country look" but "didn't want to abandon the style completely." She "just wanted it updated."

Now that's me to a 'T'. I like country but I need it to be freshened up with new life breathed into it.

The article goes on to say (and as I'm reading it I kept nodding and thinking, "Yes, yes. TOTALLY. Uh-huh, right. That's EXACTLY what I love and look for!") that Modern Country's mantra is mix it up and pare it down. It's a balance between old and new that "introduces hard edges to classic country with things like chrome, glass, leather, and metal to blend with the rustic softness of country style."

It's not just about adding industrial items to the classic country mix, but how you add them. Take for instance this loft-like area that boasts great industrial light fixtures and other hardware (oh that stool - SWOON!). It's enough to make an impact but it's not harsh, because it's warmed up with dark wood floors, classic bathroom tile, and a cozy book area.

Here are more photos from the article:

AND modern country is just as desirable for its aesthetic values as it is for its practical ones. "The desire to simplify our lives and our living environments points toward a cleaner version of country-style homes. Less clutter equals less stress, so paring down collectibles and fussy furniture to create a more streamlined decor is definitely something people are asking for." (Insert more head nodding and yes, yessing from me here)  :)

The last page of the feature showcased several decor items that would help update a home's country look. Let's have a look-see, shall we?


And isn't that "No. 52" red and white knob darling? It'd be a good look for hardware on a dresser - so cute!

Well, that's the end of the article and the end of this post (again, many apologies if I offended anyone reading) but that is not the end of my decorating. I'm SO glad to have found a. A name for my sense of style, and b. A description to follow it by.

See ya...I'm off to mix it up and pare it down! :)

Happy Thursday all!

~Amy

Wednesday, March 23, 2011

Take a Chair, Claire

***updated to link up here! :)***

spray paint party

Take a seat, Pete.

Sit down, clown.

...wait - maybe I should stop while I'm ahead. Don't wanna offend anyone tryin out my rhymes yo.  :)

Yesterday I gave you a sneak peak at a before and after of the dining chairs that go with the craigslist table I snagged.

                             BEFORE                                                                       AFTER


Astute readers may have noticed that these are actually different chairs (the before has arms, the after doesn't). Maybe I meant to do that to see if ya'll were paying attention, and maybe it's because I had already painted both armless chairs and didn't have a 'before' option other than the arm chair once I finally remembered to break out my camera. If you've read any of my previous posts I think you know what the truth is  :)

So here's how the transformation went. I knew I wanted to re-cover the seats (they were a pretty neutral color, but there were a ton of spots and stains from the previous owner. This photo doesn't really show that, but trust me, they were there:


I had to remove the seats for easier painting of the frames anyway, so recovering them while they were off seemed easy enough to do.

I laid the chair down on its back, broke out my phillips head screwdriver...


...and from underneath, unscrewed the four screws near each leg, and then the seat came off in a snap!


See all that plastic under the seat? Yeeeaaaah, I guess that was from when the seat was new, but let. me. tell. you. It was nowhere near in new condition when I ripped it off the seats. GRO-DY! Then I had to pick off a few bits that were still stuck to the frame:


Then I sanded all over, wiped it all down, and broke out this!


And here's what it looked like after one coat:


Here's a shot of a chair after its third and final coat:


If you're attempting this at home and need to know how many cans of spraypaint to buy, this project took about one can per chair, plus half of one more which I used to hit any spots I missed here and there.

So 5 cans in all, at $2.99 a can (I got all my cans from JoAnn Fabrics at 40% off), for a total paint cost of $14.95, plus tax.

*(I also used two cans of spraypaint for the table, which I'll provide my cost breakdown for when I write that post after that project is complete)

While my chairs were drying, I went inside and began working on recovering the seats. That's where this came in:


I laid the canvas out underneath the seat (there's no real right or wrong side with drop cloth canvas, but if you were using a printed fabric, make sure you lay it with the print side down, facing away from you) and cut around it leaving an extra 2 inches or so for wiggle room. 

Then I stapled the center of one side...


Stretched the cloth tight, and stapled it in the center of the opposite side...


Then continued stapling down the sides, front and back of the seat.

This Powershot staple gun is from Lowe's and cost $20. It's also a brad nail gun. It's not an air gun or anything fancy, just a straight-up heavy duty stapler :)


You'll need to leave a little room to work with for folding the edges, so don't get staple happy and staple all the way up to the corners (lesson learned)  :) 

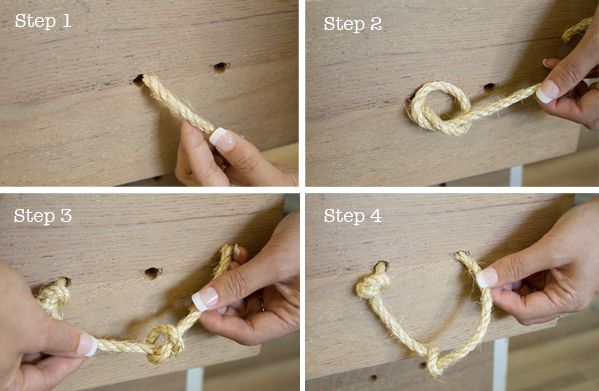
Take your fabric and fold one side down and in, while bringing the other side down over top of it. Does that make sense?


It's kind of like wraping a present, and you'll get a nice clean fold like this:


Then staple the crap out of the corner so it's re-enforced and the staples have a strong hold :) Do this for the remaining three corners, and make sure all your folds face the same direction.


Then flip it over and admire your work! :)


So with the chairs dried and your seats recovered, the next step is to put the seats back on the chairs.


I laid the chair down again (does something about that angle of the chair above feel wrong to you? It does to me, haha) and placed the seat back on top.


Then I took my screws and used my screwdriver to screw them back into the existing holes (wow, that sentence had the word 'screw' in it A LOT) and....


VOILLA! 


A purty seat seat cushion on a purty chair :)


Wow, what a difference from this, right?!


The canvas cost $15 from Lowe's (and I have MORE than half of it left over for future projects) so the total project cost for all four chairs came to just under $30, at $29.95 before tax ($49.95 if you're also buying the nail gun, but that is a one time, upfront cost, and the staples are under $3.00 a pack).

A 30-dollar makeover for four beautiful, curvy and sturdy chairs? YES PLEASE! :)


I still plan on distressing and glazing to bring out some of the details (like in the photo above and below) in the lines of the chair.


*sigh*...I likey :)


 I'm not so good at it yet, but here's my attempt at 'staging', haha :)


In hindsight, I probably should've used a cute pillow or something in place of the lunch box...oh well  :/

So, anyone have a set of chairs they've recently re-vamped? Anyone motivated to try it now? Don't be afraid if you're thinking about it - it's easy peazy pizza pie!

Thanks for stopping by and Happy Hump Day all! What? Get your mind out of the gutter...hump day as in Wednesday, as in over the hump, as in halway through the week...sheesh :)

~Amy

Linking up! :)

The Lettered Cottage

Elements Interiors
Related Posts Plugin for WordPress, Blogger...