They're done, they're done, they're done! Woo to the Hoo!
Hubs and I completed the book ledges for our son's nursery last weekend and I luuuuuuuuuuuuuuuuuuuuuuuuuuuuuuuuuuuuuuuuuv how they turned out!!!
You may rememeber we planned to put them on this wall:

Before I show you the goods, here's how the project went down. First, I enlisted your help in
this post and got GREAT feedback (via comments and texts) on which version my peeps liked best and why. Thanks again so much for all your input and support for the idea!!
As a quick refresher, these were our options:
The winner?....................
#3!
The reason we chose that is because we liked it taking up more of the wall above the chair rail, and it still allows for the possibility of expanding it below the chair rail (#4 above) down the road if more book/toy/trophy, etc. display space is needed.
So with our decision made and me itchin to get busy building the shelves, Mike and I spent some time at Lowe's last Saturday to pick up our lumber.
We used
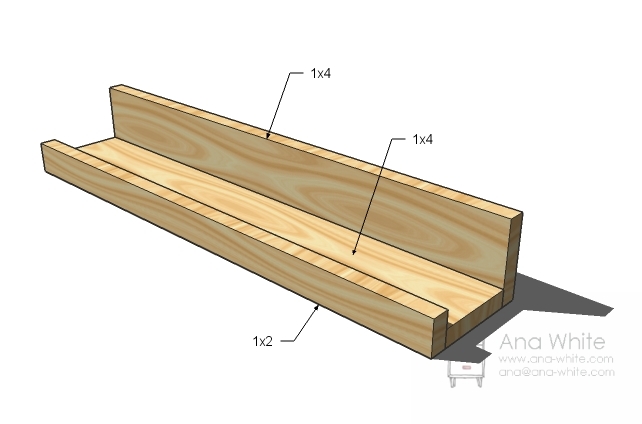
Ana White's design and this
inspiration photo to use as guides for our ledges, but we slightly modified Ana's plan...
...To make four 48" long shelves, we bought the 1x2x8s (for the front edge of the shelf), and the 1x4x8s for the back, but instead of 1x4x8s for the bottom part of the shelf (where the books actually sit), we bought 1x3x8s. Our reasoning for that was to reduce the depth of the shelves so that they only came off the wall 5 inches instead of 6. We didn't want to increase any chances of bumping into them and bruising shoulders (hey, I bruise easily) if they stuck out any further than necessary. Plus it makes them a little more streamlined and low profile.
My Mikey must've been as gangbuster about the project as I was, cuz as soon we got home from Lowe's he immediately got to work measuring and making the cuts:
Then we used a flat surface (our kitchen island) to set up the three pieces to make each shelf:
We drilled 3 pilot holes and 2-inch screws (one at each end and the middle) through the front vertical ledge into the horizontal base, and 3 pilot holes and 2-inch screws through the back vertical piece into the horizontal base.
And we made sure to sink the screws a bit...

...so that we could conceal them with spackle and they'd be unnoticeable once sanded and painted:
Here they are the next day, all painted, dried and ready to be hung! :)
 |
| Winston made sure he was a part of the project too ;) |
So here's the before and after we hung them in a side-by-side comparison:
Not too shabby, right? :)
We hung them right in the middle of each painted stripe and fastened them securely to the wall with anchors (unfortunately we couldn't find/hit any studs) and more 2-inch screws by drilling right through the back of the ledges.
Here's a closeup of them after we vacuumed up the plaster mess (from all our hole drilling) and concealed the screw heads with a little white paint:
YAY!
Now, you may be saying to yourself, "Self, I know Amy said they made 4 ledges but there are only 3 in her photos." And you'd be right! While we were determining where to hang the shelves and the spacing between each, we realized 4 shelves in the setup weren't going to work. Either the top shelf was way to high for my 5'4" self to reach; or bringing that top shelf down within reach cramped all the other ledges together to much, and taller books wouldn't have fit on the bottom three shelves.
So we only hung 3....and then I expeditiously filled them with books we had waiting in the wings :) Thanks to Mike's mom for those!!
I'm VERY pleased with how it turned out! :)
Here are some more "beauty shots"....

Here's our estimated (don't have the receipt in front of me) cost breakdown for the book ledge project:
Lumber: $45
Pack of 2-inch screws: $5 (already had the wall anchors)
Primer and paint: FREE (already had)
Total cost: $50
OH! and don't worry, we didn't waste the 4th ledge we opted not to use for the book shelf project...we used it somewhere else in the nursery. Can you guess where? HINT: The idea came to me real quick and I didn't even have to "sleep" on it.... :)
 Hello there! If you remembered that I was stumped on how to hang the warn-wrapped letters I made for over the crib...