Well slack no more (which is also what my pants said now that they're fully filled with nuthin but belly, haha) cuz here we go! The last picture you saw of our rec room was this one, in its horrid, incomplete state:
Only the ceiling had been painted and the walls were unfinished. The tile was in at the entryway (behind me from where the above photo was taken) but there was no carpet on the floor. Here's a wide shot where you can see the nasty concrete floor:
Well my dears, you're in for a real treat cuz this room did a total 180 once we painted the walls (Dover White by Sherwin Williams), installed and painted the trim, and had Lowe's install the carpet. We're in LOVE!!!! And best of all, Winston approves :) It's the only carpeted room in the house and he loves to sprawl out on the floor and naw on his bone til his little heart's content.
VOILA:
So, not one to sit on my laurels, I got to brainstorming how we'd set up the desk area in this small but multi-functional space (remember, there's a half bath and laundry behind the double doors on the right side of the room) since it also has to function as an office area.
See that desk and chair at the bottom, left corner of the photo above? That's an IKEA table and 4-chair set we bought from friends when hubs and I first moved in together and it served as our kitchen table. But most recently, in this house's room it was our desk. Problem is, it stuck out too far into this narrow room and didn't provide enough of a work surface or concealed storage for papers, CDs, and other desk supplies, so we decided to craigslist it.
We wanted to keep our old filing cabinet (in the corner of the room in the above photo) and somehow incorporate that into a new desk setup. Then my thoughts turned to what John and Sherry did over on YHL to create their office desk space:
 |
| YHL pic from here |
They found second hand nightstands to use as their base storage and then created a desktop out of wood planks for a nice wall-to-wall built-in look.
We didn't need two spots for chairs like John and Sherry did, but their general setup was something I could duplicate for our space. I checked out craigslist for cabinets and nightstands that would work for us, but no luck. They either weren't a good price, or were too deep - we needed something shallow and streamlined to make the best use of our long and narrow room.
Then I stumbled upon these at Michael's one day during a week they were 40% off:
They're 14.5 inch cubes you can stack and customize to any configuration you want. There are cubes with shelves, 1, 2 and 4 drawer options, filing cubes, etc. And at 14.5 inches deep, they're a PERFECT fit for our space.
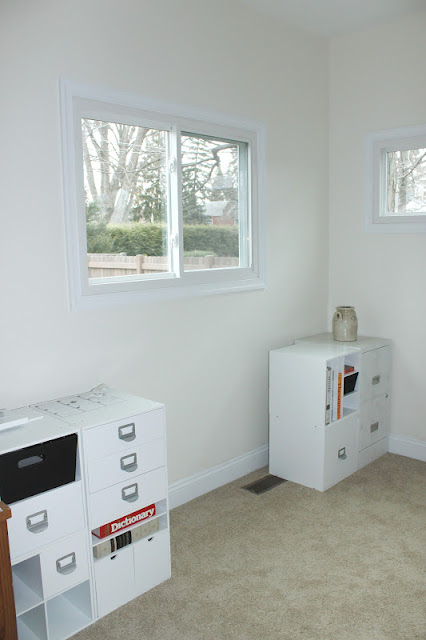
Mike and I decided they were a great solution for us and we purchased 6 cubes for about the same amount of cash we got from craigslisting the old desk - I love a good swap! :) Here's the left side with 4 cubes mostly assembled and stacked:
And here's a wider view where you can also see the right side with two cubes assembled and stacked next to our original filing cabinet we were able to retro-fit into the setup:
We centered the opening for the desk chair under the window (I used a chair from our old desk set to illustrate):
And here are two photos taken from the other side of the room:
The filing cabinet had a crude spraypaint job, which we later freshened and brightened up with white paint to match the other cubes (I'll share those pics in a later post).
We also secured the cubes together with brackets and screws so that they are each one unified base, which made them sturdier as well.
Next came time for a desk top! We took our measurements and trotted out to Lowe's to see if they had anything that would work. Guess what, THEY DID! :)
It's a 3/4", 20" x 96" solid wood panel that fit our measurements perfectly! Like couldn't have worked out any better perfectly! We didn't need to cut it down at all since it's the exact length we had the bases spaced apart and it left just the right amount of overhang at the front and back of the desk.
Plus it was only about 30 bucks after we used a Lowe's 10% off coupon :)
Another good thing? It was pre-sanded so all we had to do was break out the stain (which we already had in the basement from previous projects).
The finish is called Jacobean and it's a nice, dark and rich color:
After the stain had the proper time to dry, we did several topcoats of acrylic in a satin finish to protect the wood and give it a gorgeous gleam. But those are pics I'll share another day, along with the finished product of the desk top and bases assembled.
OOO! and we also solved a window treatment dilemma we were having (four windows could = a pretty penny in window dressings), but we bucked having to shell out crazy dough with a simple fix I'll share later.
Toodles til then! And if you're on the east coast like moi, I hope you're enjoying the awesomest March weather ever!! :)


No comments:
Post a Comment