Thursday, September 29, 2011

Getting the Message

Our kitchen is pretty small, but was in need of a message center that wouldn't clutter up the fridge.

Enter this door:


It's the door that leads to our basement, and it's directly oposite from the kitchen stove, on the other side of the island. I decided to deck it out in magnetic paint (so it could hold papers with little magnets) under a coat of chalkboard paint.

I wasn't sure if it'd make the already-small kitchen feel smaller, but then I thought, "hey, if it's hideous, I can paint right back over it in semi-gloss white" :)

So hubby helped me take it off the hinges and bring it outside. I taped and papered up the perimeter of the door along the perimeter of the inset and sanded it down:

I bought this can of Krylon magnetic paint in a spray can...


...and got this far before the can crapped out, not even 1/4 of the way used:


I thought, oh well, maybe it was a fluke. So I went back to the store, exchanged that can for another can, came back and tried again...still this:


I'm not sure what the issue was, but the can would start to spray, then sputter out. I'd let it sit, then it would spray a little again, then quit again. The nozzle wasn't clogged and I followed the directions to a T.

Maybe it was a pressure issue with the can. Maybe the paint was bad (who knows how long the cans had sat on the stores shelves), but I returned the can, and instead of spray, went with a quart of Rust-oleum magnetic paint:

I would've bought it in this form from the get-go, but the store I was at only had the spray cans. I was too lazy to drive another 30 minutes to go to another store at the time :)

My husband needed grass seed so he ended up getting it while at the other store. Thank goodness for non-lazy husbands :)

While there, he also picked up this:
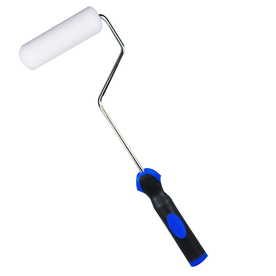
WHIZZ 4" Cabinet and Doors Paint Tool
photo from here

It's a foam roller kit specially for doors and cabinets. It creates a smooth finish so there are no brush stroke marks.

I didn't have a paint tray, but I improvised with a plastic storage container wrapped in aluminum foil :)


After three thin and even coats, (with a half-hour of dry time like the directions called for) it looked like this:


Close up, you can see that I didn't bother getting it flush up to the tape. I don't plan on putting any magnets along the boarder of the door. I just wanted to make sure I had the interior thoroughly covered:


I let it dry 4 hours (the directions recommend letting it dry 4 hours before doing a top coat of paint of your choosing) and then I did a coat of Rust-oleum chalkboard paint:

photo from here
This time I used a brush to get the paint flush up to the tape all the way around the edges. Then I used the roller and started at the top and worked my way down. Here's what it looked like halfway...


...and all the way done. GLORIOUS chalkboardness! Which IS a word now :)


I only did one coat of the chalboard paint because A- it covered extremely well, and B- I was worried another coat might reduce the strength of the magnetic paint (even though the directions said it may only lose magnetic power after more than two top coats).

I didn't want to risk it. Hi, my name is Amy No-Risk-Taker Storm :)

Once dry, we brought it back in, took off the tape and paper, and re-hung it in the hinges.

She looks grrrrrrrreat! :)


It's the perfect place to jot down our grocery items as we think of them.


And the magnet works! There's already piece of mail hung that we need to come back to later to take care of:


 And it's stayed put. It's in the same place since completing the project 4 days ago (I was worried abuot the magnets sliding down the door if something was too heavy for it to hold).


One thing I will note though, is that it only holds up these kinds of magnets. I tried two different kinds of clip magnets and they were a no-go :/ Just slid down the door. But the kind in the photos above work just fine.

Since taking these photos, hubs has already jotted a note about scheduling for an upcoming wedding we're attending. If he's using it, it's DEF. functional....AND fun! :)

Love it!


So what do ya think? I think it works great but worry it could get a little cluttered looking...We'll have to stay on top of that and let you know how it's functioning down the road.

I think what I'm most excited for is having a place for future kiddos to draw and letting them have their "art" displayed :)

How bout you? Anyone out there recently complete a similar project? I wanna hear about it! 

OH! And this project got my wheels turning for ANOTHER chalkboard paint project when I saw this inspiration photo:

(wish I could remember the source of this pic but can't) :(

I have an old toy chest from my grandparent's house that could use a makeover and this could be the ticket! Oh chalkboard paint, how I love thee! :)

Have a great day!

Monday, September 26, 2011

Happy Fall Y'all!

I finally put out some Fall decorations after seeing some blogland inspiration.

This one came from Thrifty Decor Chick. She used clear glass Ball jars but I have a TON of these blue glass ones I inherited from my grandma's extensive collection. She had so many, my mom even has a ton too :)


There are little battery tea lights in each of the jars sitting on top of the candy corn. It looks so cool at night! Also like TDC, I don't touch candy corn - BLECH. So this is a nice display w/out the worry of eating it all! ;)


These are cute little tin ornaments I found at a random craft store a few years ago.


Here's our mantel decorated for Fall. It'll probably get a spookier makeover come Halloween, but for right now I like its simple statement:


The TV obviously is what takes center stage above our fireplace mantel, but adding the pumpkin-colored garland and gold & red accents helps Fall-ify things :)

On the left, I spray painted that wooden letter S gold, and the picture of the red church with the iron gate is a photo taken and shared by The Lettered Cottage. Layla used it in her fall mantle display last year.

Here's the console cabinet decked out in some new duds:


It used to look like this:


See that basket on the top, left shelf and how it's missing a weave near the bottom? Yeah, Winston decided to do that one day. And then another day he decided to destroy the entire basket all together. grrrrrr

So I bought some new, inexpensive baskets from Christmas Tree Shops and replaced the old baskets and metal bins. I like the cohesive look much better now. Thanks Winston??  :)


The console's other new duds are my cutie-patootie pillow pumkins:


I like seeing the three of them sitting there in a row :)

On our dining table I put some faux gourds and leaves in a huge apothecary jar I won at an auction (only 12 bucks baby!) and some of our cork collection in my dollar store hurricane vases.


Just the other day I was looking through the corks (some of them are labeld, some aren't) and I saw the one we labled "new house 2009" from the night we closed on this joint and popped a bubbly bottle to celebrate.

It made me smile remembering that we sipped our champagne while simultaneously tearing out the horrible pink carpet and scrubbing the floors :)


I'm linking this post up tomorrow to Layla's "It's Fall Y'all" mantle linky party !


Happy Fall Ya'll! :)
~Amy

The Lettered Cottage

Monday, September 19, 2011

New Life for an Old Lamp

I mentioned a few posts ago that we held a garage sale at my in-laws the other weekend.

It was a two-day affair and by the end of day two, a pair of these lamps (marked at only .50 cents each!) hadn't sold. I couldn't believe it.


I thought for sure they were quickly going to be snatched up by someone else who saw what I saw: potential beyond their tired wood and brass facade.

But alas, no takers. I tried to pay my mother-in-law $1 to take them home with me. She wouldn't allow it (you're the best Nance!) and so they were mine...

FO FREE! :)

I spray painted them (primer first, then 2 coats of glossy white) and topped each with linen-like shades that I already owned.

Bam.


My only cost: $4.50 for the can of glossy white spray paint from JoAnn Fabric(used a coupon). That's right, 2 lamps for $4.50. AND I still have half the can left for a future project.

Now THAT'S economical home decor! :)

Friday, September 16, 2011

What a Trip!


Perhaps the photo below, from my last post about our yardsale, was a bit of foreshadowing on my part...


...because as the first pic of this post illustrates, my honey and I just got back from a WONDERFUL early anniversary vacation to the Cayman Islands! (our anniv. is actually Oct. 10th).


Look at that view!

Here's a pic of where we stopped for lunch as soon as our plane touched down on the island (and we'd picked up our rental car).


The beach was right behind this cafe and we sat on the deck and soaked up the incredible view. I tried to get it in this shot, but along with the sign, I couldn't get a wide enough angle.

But don't fret, here's a beach pic. This was our first day on the beach:


We stayed at Morritt's Tortuga Club at the far East End of the island. Here's our building where our room was:


That picture was taken from the parking lot (obviously) but our room had a secluded pool view that was so serene.

Here we were eating lunch at Rum Point where we snorkeled and swam with 3 resident sting rays!


The dock at Rum Point

In the photo below, do you see that HUGE cloud seemingly touching the water? That was a brilliant storm with lightening over Georgetown (the island's main town where the cruise ships dock) yet it was gorgeously sunny where we were sitting. We watched God's show in awe - so cool!


The Caymans are known as one of THE best places to snorkel, and we were not disappointed. Such color and beauty below water was beyond my imagination. We saw fish and sea life of every kind, including a barracuda!!


We stayed on Grand Cayman, the largest of the three islands that make up the Caymans. The others are Cayman Brac (second largest) and Little Cayman (the smallest).


Our resort had these hammocks resting in the sand throughout the beach. They were so inviting, calling out to us, "Come sit. Take a load off, relax, and enjoy the view."


My camera had this cool panoramic feature that I didn't even know about til I was playing around with it while on our trip, which I'd say was quite well-timed because what better place to take a panorama photo than the Caribbean?! :)


This next photo is one of my two favorite photos from our vacation (the other one is of my modest hubby, who won't let me post it because he's in his swimsuit - so cute).

We stopped at the famous site of the Ten Sails Wreck (which occurred in the 1700s) and I was standing at the memorial stone when Mike snapped this from a platform he was standing on behind me.


If you look out to the horizon just right of where I'm standing, you might be able to make out a few small black specks sticking up out of the water. Pretty sure that's part of the wreck, still visible more than 200 years later. I say 'pretty sure' cuz it's pretty far out there and we never made it out to see it. Although while there, we saw a waverunner excursion head out to the site - that's probably a GREAT snorkel spot too!

I'll leave you with this eye candy -  a photo mike took of his mimosa one morning at sunrise. Yup, we woke up super early one morning and made sure we watched the sun come up out of the ocean. I can sum it up in one word...Spectatular.


Although I was sad when our vaction ended and it was time to fly back to Pennsylvania, I was also glad to arrive home and say, "Welcome!" to Fall (my favorite season you know). Yesterday was the first time this season I broke out my fleece for our walk. YAY! :)

Thanks for checking in today. I've got some more DIY projects, Rec room planning progress, and other home-related posting goodness in store for my upcoming posts. See you back here then, and enjoy your weekend!!

~Amy
Related Posts Plugin for WordPress, Blogger...